How To Weatherproof Your Home Windows
Weatherproofing Your Windows: A Comprehensive Guide
Leaky, drafty windows are a homeowner’s nightmare, inviting discomfort, wasting energy, and inflating utility bills. Fortunately, effectively weatherproofing your windows is a manageable DIY project that can significantly improve your home’s comfort and efficiency. This guide provides a comprehensive approach to identifying and addressing common window issues, ensuring your home stays cozy in winter and cool in summer.
Understanding the Problem: Identifying Leaks and Drafts
Before tackling any weatherproofing projects, it’s crucial to pinpoint the sources of drafts and air leaks around your windows. Here are a few simple methods:
- The Hand Test: On a cold or windy day, carefully move your hand around the window frame, sashes, and glass panes. Feel for any subtle breezes indicating air leakage.
- The Candle or Incense Test: Light a candle or incense stick and hold it near the window edges. If the flame flickers or the smoke wavers, you’ve found a draft.
- The Paper Test: Close a window on a strip of paper. If you can easily pull the paper out, the seal is weak and needs attention. Repeat this test around the entire window.
- Visual Inspection: Examine the window frames, sashes, and caulking for cracks, gaps, or damage. Look for signs of moisture or mold growth, which can indicate air and water infiltration.
Tools and Materials You’ll Need
Gathering the right tools and materials will streamline your weatherproofing efforts. Here’s a list of common items:
- Caulk and Caulking Gun: Choose a high-quality, paintable caulk specifically designed for exterior use. Silicone and acrylic latex caulk are popular options.
- Weatherstripping: Various types of weatherstripping are available, including foam tape, felt, V-strip, and tubular rubber or silicone. Select the appropriate type for your window style and the gap size you’re addressing.
- Clear Plastic Film and Double-Sided Tape: For creating temporary window insulation during the winter months.
- Backer Rod: Used to fill large gaps before applying caulk, preventing excessive caulk usage and ensuring a proper seal.
- Putty Knife or Scraper: For removing old caulk or paint.
- Utility Knife: For trimming weatherstripping and plastic film.
- Measuring Tape: To accurately measure gaps and window dimensions.
- Cleaning Supplies: Soap, water, and a sponge or cloth to clean window surfaces before applying caulk or weatherstripping.
- Safety Glasses and Gloves: To protect your eyes and hands during the project.
- Ladder or Step Stool: For reaching high windows.
Step-by-Step Weatherproofing Techniques
Now that you’ve identified the problem areas and gathered your supplies, let’s dive into specific weatherproofing techniques:
1. Caulking Around Window Frames
Caulking is essential for sealing gaps between the window frame and the surrounding wall. Follow these steps:
- Prepare the Surface: Thoroughly clean the area around the window frame, removing any dirt, debris, old caulk, or loose paint. A putty knife or scraper can be helpful for removing old caulk.
- Apply Backer Rod (If Necessary): For gaps larger than ¼ inch, insert backer rod into the gap to provide a support for the caulk and prevent it from sinking too deep.
- Load the Caulking Gun: Cut the tip of the caulk tube at a 45-degree angle, making the opening slightly smaller than the gap you need to fill. Puncture the inner seal of the tube with a long nail or wire. Load the tube into the caulking gun.
- Apply the Caulk: Hold the caulking gun at a 45-degree angle and apply a smooth, consistent bead of caulk along the gap. Maintain steady pressure on the trigger and move the gun at a slow, even pace.
- Smooth the Caulk: Immediately after applying the caulk, smooth the bead with a wet finger or a caulking smoothing tool. This will create a clean, professional finish and ensure a good seal.
- Clean Up: Wipe away any excess caulk with a damp cloth. Allow the caulk to dry completely according to the manufacturer’s instructions.
2. Weatherstripping Window Sashes
Weatherstripping seals the gaps between the window sash (the part that moves) and the window frame. The best type of weatherstripping depends on the type of window and the size of the gap.
Foam Tape:
Foam tape is a cost-effective option for sealing small gaps. It’s easy to install but may not be as durable as other types of weatherstripping.
- Clean the Surface: Clean the window sash or frame where the weatherstripping will be applied.
- Measure and Cut: Measure the length of the area to be weatherstripped and cut the foam tape to the appropriate size.
- Apply the Tape: Peel off the backing and carefully apply the foam tape along the edge of the window sash or frame. Press firmly to ensure good adhesion.
Felt Weatherstripping:
Felt weatherstripping is another affordable option for sealing small gaps. It’s less durable than foam tape and is best suited for areas with minimal friction.
- Clean the Surface: Clean the window sash or frame where the weatherstripping will be applied.
- Measure and Cut: Measure the length of the area to be weatherstripped and cut the felt weatherstripping to the appropriate size.
- Attach the Felt: Felt weatherstripping typically has an adhesive backing. Peel off the backing and carefully apply the felt along the edge of the window sash or frame. Alternatively, use tacks or staples to secure the felt in place.
V-Strip Weatherstripping:
V-strip weatherstripping (also known as compression weatherstripping) is a more durable option that creates a tight seal when the window is closed. It’s suitable for both sliding and hinged windows.
- Clean the Surface: Clean the window sash or frame where the weatherstripping will be applied.
- Measure and Cut: Measure the length of the area to be weatherstripped and cut the V-strip to the appropriate size.
- Install the V-Strip: Peel off the backing and carefully insert the V-strip into the gap between the window sash and the frame. The “V” shape should face outward. When the window is closed, the two sides of the “V” will compress together, creating a seal.
Tubular Rubber or Silicone Weatherstripping:
Tubular weatherstripping is a durable and effective option for sealing larger gaps. It’s often used on older windows and doors.
- Clean the Surface: Clean the window sash or frame where the weatherstripping will be applied.
- Measure and Cut: Measure the length of the area to be weatherstripped and cut the tubular weatherstripping to the appropriate size.
- Install the Tubular Weatherstripping: Some tubular weatherstripping has an adhesive backing. Peel off the backing and carefully apply the weatherstripping along the edge of the window sash or frame. Other types of tubular weatherstripping require you to nail or staple them in place.
3. Installing Window Film
Window film is a temporary solution for adding an extra layer of insulation during the winter months. It creates an air pocket between the window and the film, reducing heat loss.
- Clean the Window: Thoroughly clean the window surface.
- Apply Double-Sided Tape: Apply double-sided tape around the perimeter of the window frame.
- Cut the Film: Cut the plastic film slightly larger than the window frame.
- Attach the Film: Carefully press the plastic film onto the double-sided tape, ensuring it is smooth and wrinkle-free.
- Shrink the Film (Optional): Use a hair dryer to shrink the film for a tighter, more transparent fit. Hold the hair dryer a few inches away from the film and move it slowly back and forth.
Additional Tips for Window Weatherproofing
- Inspect and Maintain Regularly: Periodically inspect your windows for signs of wear and tear, such as cracks in the caulk or damaged weatherstripping. Address any issues promptly to prevent further damage and maintain optimal energy efficiency.
- Consider Window Treatments: Heavy curtains or blinds can provide an extra layer of insulation, helping to reduce heat loss in winter and block sunlight in summer.
- Upgrade to Energy-Efficient Windows: If your windows are old or damaged beyond repair, consider replacing them with energy-efficient models. Look for windows with a low U-factor (indicating good insulation) and a low solar heat gain coefficient (SHGC) to minimize heat gain in summer.
- Professional Assistance: For complex window repairs or replacements, it’s best to consult with a qualified contractor. They can assess your needs and recommend the most appropriate solutions.
Conclusion
Weatherproofing your windows is a worthwhile investment that can improve your home’s comfort, reduce energy consumption, and save you money on utility bills. By following the steps outlined in this guide, you can effectively seal drafts, minimize heat loss, and create a more energy-efficient living environment. Remember to prioritize safety and take your time to ensure a quality job. A little effort can go a long way in making your home a more comfortable and efficient place to live.
 706×484 tips weather proofing window types home depot from www.homedepot.com
 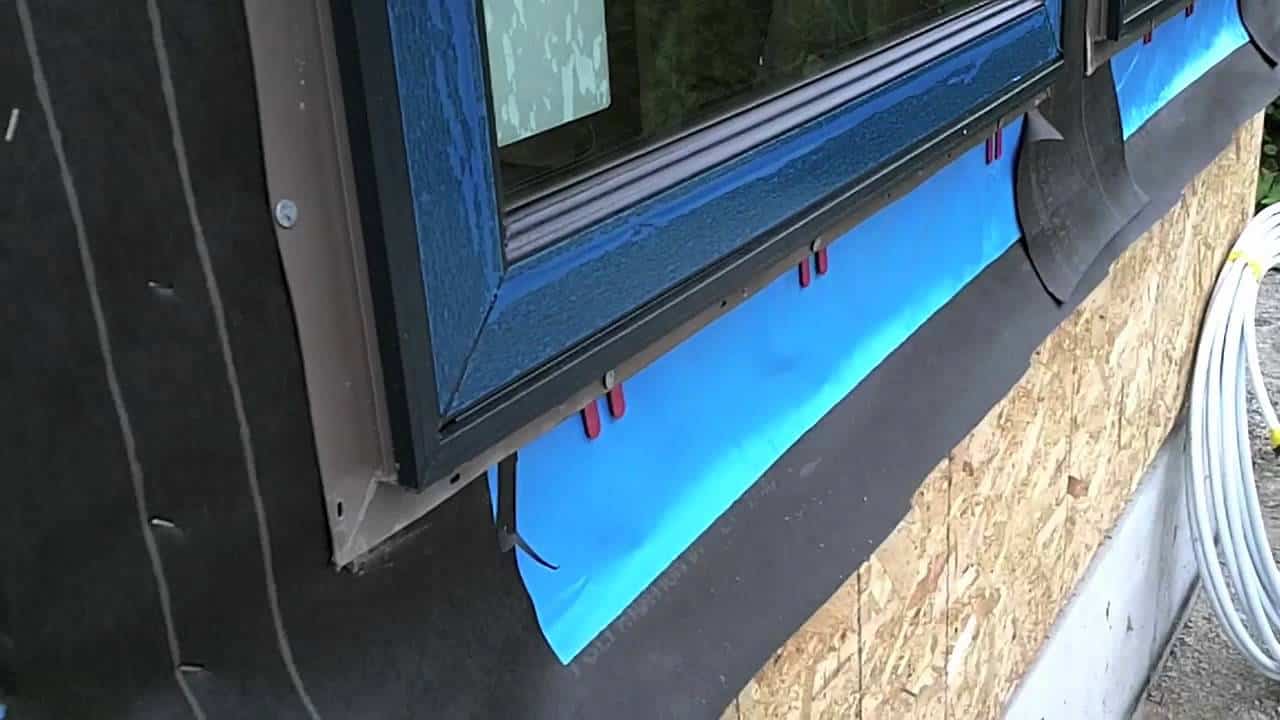 1280×720 weatherproof windows housing forum from thehousingforum.com
  414×188 weatherproof windows doityourselfcom from www.doityourself.com
  1170×781 weatherproof home seasons wassup mate from www.wassupmate.com
  303×306 weatherproof window from www.stepbystep.com
 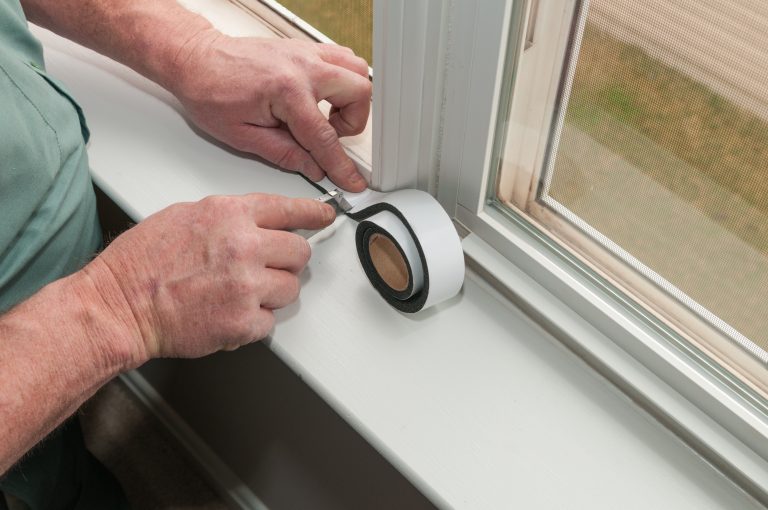 768×510 weatherize homes windows helpful winter prep tips from modernize.com
  1130×1200 weatherproof window installation fine homebuilding from www.finehomebuilding.com
  460×260 weatherproof window installation episode insulation air sealing from www.finehomebuilding.com
  1200×800 step step guide weatherproofing windows year from chicagowindowguy.com
 Thank you for visiting How To Weatherproof Your Home Windows. There are a lot of beautiful templates out there, but it can be easy to feel like a lot of the best cost a ridiculous amount of money, require special design. And if at this time you are looking for information and ideas regarding the How To Weatherproof Your Home Windows then, you are in the perfect place. Get this How To Weatherproof Your Home Windows for free here. We hope this post How To Weatherproof Your Home Windows inspired you and help you what you are looking for.
How To Weatherproof Your Home Windows was posted in August 31, 2025 at 9:15 pm. If you wanna have it as yours, please click the Pictures and you will go to click right mouse then Save Image As and Click Save and download the How To Weatherproof Your Home Windows Picture.. Don’t forget to share this picture with others via Facebook, Twitter, Pinterest or other social medias! we do hope you'll get inspired by SampleTemplates123... Thanks again! If you have any DMCA issues on this post, please contact us!